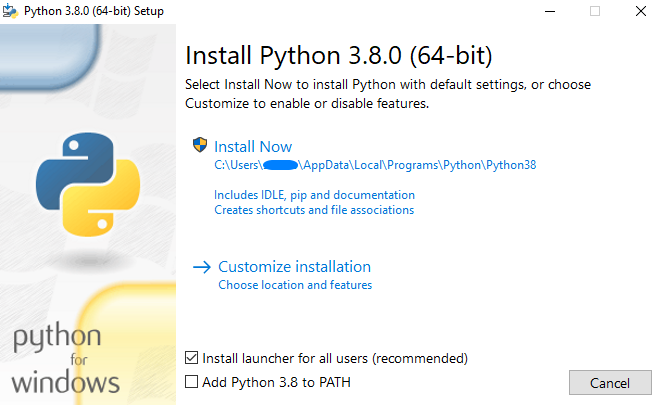
You can install the odrivetool in a few ways, in the following sections two methods are explained: Windows standalone Python and Ubuntu.
ODrive has a lot of settings, but there are a few that are necessary to get it working (and not break anything), these will be discussed in this section.
When the board is connected, it shows the id, the id is odrv0 if there's only one board, with axis0 and axis1 you select the axis.
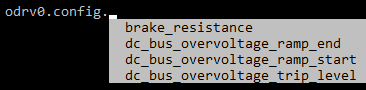
When entering or looking for commands, you can use the tab button to see all available options, use the arrow keys to navigate, for example:
If something goes wrong, for example, the motor is not in closed loop anymore, you can check errors using:
dump_errors(odrv0)
Set your encoder counts per revolution (CPR = 4PPR):
odrv0.axis0.encoder.config.cpr =
Set the current limit:
odrv0.axis0.motor.config.current_lim =
Set the velocity limit:
odrv0.axis0.controller.config.vel_limit =
Set the number of pole pairs (# pole pairs = # magnets / 2):
odrv0.axis0.motor.config.pole_pairs =
If you are using a brake resistor, set the variable to true:
odrv0.config.enable_brake_resistor = True
To get everything working, you can try the calibrations first and when they work, you can enable them on startup:
First try the full calibration, if that doesn't work, you can try them each separately:
odrv0.axis0.requested_state = AXIS_STATE_FULL_CALIBRATION_SEQUENCE
Motor calibration (this measures phase resistance and inductance):
odrv0.axis0.requested_state = AXIS_STATE_MOTOR_CALIBRATION
Encoder offset calibration (this measures the offset between the electrical and encoder position):
odrv0.axis0.requested_state = AXIS_STATE_ENCODER_OFFSET_CALIBRATION
If you want to use an index pin:
odrv0.axis0.requested_state = AXIS_STATE_ENCODER_INDEX_SEARCH
Now you can enter closed loop control, when you turn the motor, it should return to the original position:
odrv0.axis0.requested_state = AXIS_STATE_CLOSED_LOOP_CONTROL
Now that all this is working, you can save the motor calibration and encoder offset (if you have an index pin or absolute encoder) so it doesn't do it every time, but it's not a necessity:
odrv0.axis0.motor.config.pre_calibrated = True
odrv0.axis0.encoder.config.pre_calibrated = True
You can enable these commands to run at startup.
If your motor calibration is not saved, you can enable it on startup:
odrv0.axis0.config.startup_motor_calibration = True
The same is true for the encoder offset:
odrv0.axis0.config.startup_encoder_offset_calibration = True
If you are using an index, you can also enable the search on startup:
odrv0.axis0.config.startup_encoder_index_search = True
Now you can enable closed loop on startup:
odrv0.axis0.config.startup_closed_loop_control = True
Save your configuration and reboot the ODrive, the board should run the enabled startup functions:
odrv0.save_configuration()
odrv0.reboot()
Now the basics are set up, you can start using the board, there are a few control modes: velocity, torque, and position.
To enter velocity control:
odrv0.axis0.controller.config.control_mode = CONTROL_MODE_VELOCITY_CONTROL
To set the desired speed:
odrv0.axis0.controller.input_vel =
To enter torque control:
odrv0.axis0.controller.config.control_mode = CONTROL_MODE_TORQUE_CONTROL
To set the desired torque (you can set the torque constant using odrv0.axis0.motor.config.torque_constant):
odrv0.axis0.controller.input_torque =
To enter position control:
odrv0.axis0.controller.config.control_mode = CONTROL_MODE_POSITION_CONTROL
To set the desired position:
odrv0.axis0.controller.input_pos =
There are a lot more settings, you can find them using the tab button as mentioned before, and you can take a look in the ODrive docs.